07. RGB Color Model
07. RGB Color Model
Introduction to pixel shaders
Welcome
Welcome
Goodbye
Goodbye
🔗 References
Wikipedia: Additive Color
https://en.wikipedia.org/wiki/Additive_colorShader Template (using Three.js v.180.0) - May 2026
https://codepen.io/ilithya/pen/wvOLPZrShader Template Gist
https://gist.github.com/ilithya/4c4415c013b2d18e6c83bbc34c2e47e8CodePen
https://codepen.io/ThreeJS
https://threejs.orgColorKit Color Picker
https://colorkit.co/color/91eab9/
🎥 Transcript [16:18]
RGB color model [00:00]
Let's talk about RGB color model. I want you to start wrapping your head around thinking of RGB color when you're going to be creating with pixel shaders. In color theory, there are two main color theories. One is called additive and the other one is subtractive. Additive color theory means color in light, and the subtractive theory is color reflected in light.
Additive color theory [00:34]
In our case, we can think of using the pixels to paint in our computers, because the monitor, just as television, emits light. So then the color is going to be emitted by those beams of light and that's why we use the RGB color model instead of a subtractive color model that is for print, CMYK.

Here behind me, you can see how the additive color theory works. You can think of, for example, three beams of light that come out of our screens. One beam of light being red, another one yellow, another one blue. It's called additive theory, because when you have color in light and you put them [together] and start stacking them over and over, layering them together, you get brighter colors and eventually, as you see in the image behind me, you get even white light when you overlap the three beams of light of these three different colors.
Now, you might be already familiar, if you've used [the] RGB color model before, with the 8-bit way of assigning values to color in our computers and that's a value of 0 to 255. For example, if you want red, normally that would be like 255 in the red channel or if you wanted it in the green channel, you would assign 255 there.
RGB with percentage values [02:13]
There are different ways to express the RGB colors in our computers. One way is that one, that you might be familiar with. Another way is a percentage way to assign a value to know which channel you are reading and that would be, for example, instead of 255 to define a color, you would give it 100% if you want red [in its channel] and so on and so forth, for each of the colors.
When we start now writing our first hello world with pixel shaders, for me, it got easier to think about the percentage way of assigning color in RGB color model, to then translate into floating point numbers, because remember I said that we're going to write GLSL, and in GLSL we're going to be using a lot of floating point numbers in code to create and define color values in our pixel shaders, and those floating point numbers are going to go, especially when we talk about the red, green and blue channels, from 0 to 1.
We can think of the percentage way of defining the colors from 0 to 100, and that's why I like to teach thinking about the percentage value instead of the 8-bit color value when you think about RGB, because if you try to translate, let's say, 255 on the red channel into GLSL into a floating point number, it's not going to work. It's not going to be 2.5 or 25.5, because we need to stay in the spectrum of 0 to 1 in floating point numbers. By thinking of the percentage way of defining them, it's going to become easier to digest that when we type 1.0, we mean that we have a hundred percent value whether in the red, green or blue channel.
Pixel (fragment) shader template [04:23]
And to get started then, I prepared already a template for you, so that we can start coding a bit, and say hello world with pixel shaders. You will find a link in the description of this video, and if you go to CodePen and there's a button there, here you can see there's this Fork button, you can click there, and then it's going to create a copy on your profile.
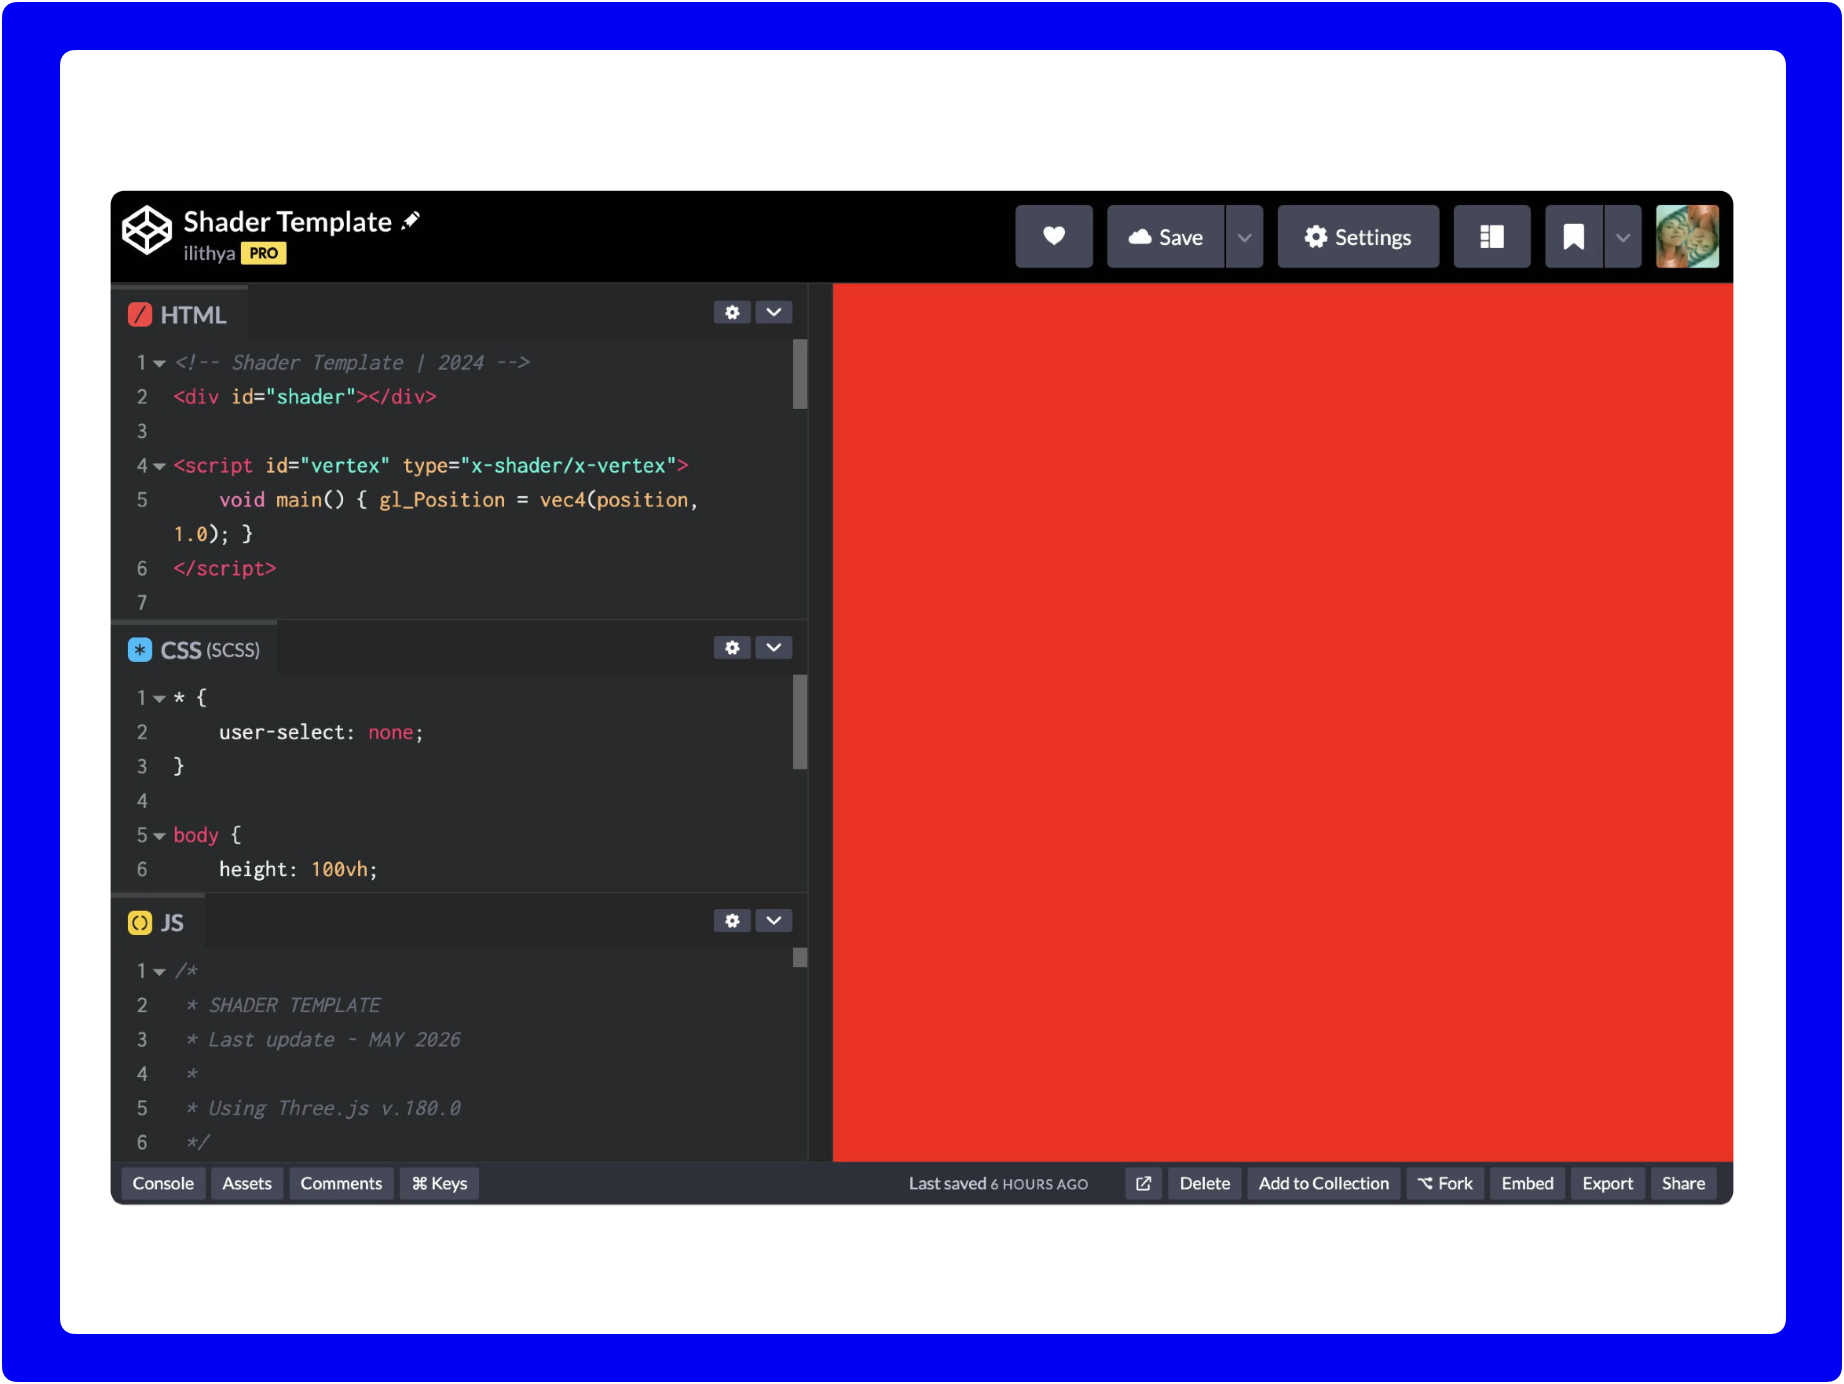
By the way, if you've never used CodePen I suggest that maybe for this course, to follow up, you can create an account. It's for free and then you're going to be able to save copies of all the exercises that you might want to do.
If you don't want to use CodePen and want to use one of the shader editors out there, because there are many, I prepared as well a gist with the code for now, for the hello world. Feel free, as well, to find the link in the description, and use that in any other shader editor, if you don't want to use CodePen.
For now, I will focus on using CodePen on our exercises and I like to do that when I teach my workshops, because I feel that by seeing the way that not only the pixel shader code is there, but you also get a glimpse of how we build this template with WebGL, [you get a better understanding]. Remember when I was talking about the GLSL pipeline, that we also need a vertex shader, so in here you get a glance of the vertex shader and the way that in JavaScript you need to implement WebGL.
Also, because you want to learn... if you're here is because you want to learn pixel shaders for doing creative coding, and I can imagine that then it's going to be valuable with this template to understand that when you do pixel shaders, you will be able to use JavaScript libraries like ThreeJS. My template is based on ThreeJS, but eventually if you are a person that's been doing a lot of p5.js for example, then you'll be able to do so, and translate that into there.
Let's jump into the template now. Here it is the CodePen again, behind me. You cannot see it, but there is a Fork button, so that you can copy and follow through. And this is what I mean that I wanted to show you here, a little bit of how we are making our fragment shader.
HTML in the template [07:15]
Here in the code in the HTML [CodePen screenshot above], you can see that there's a script tag with an ID called vertex that would be our vertex shader that we still need in order to see our fragment shader on the screen, and then right below is our fragment shader.
/* GLSL */
precision highp float;

uniform vec2 u_resolution;
uniform float u_time;

void main() {
  /* Pixel (fragment) shader code */
}
And we see the code, that in the previous video you saw, that we're gonna be using [in] this template all the time with the precision highp float; and the two uniforms u_resolution and u_time that... they will be valuable and useful, eventually, not yet, but we will use them. And then inside the void main() is where we're gonna write our pixel shader.
JavaScript in the template [08:01]
Then I can also show you here, for example the JavaScript. This is what I mean, that I thought would be valuable for you to also see a little bit how it works. In order to for us to render that fragment shader on the browser we need to tell the browser to read the vertex and the fragment shader, let's say put it together via WebGL, and for that we're using a WebGL library called ThreeJS here. In here I wrote on the notes [code comment] if you're curious to know as well which version am I using.
/*
 * SHADER TEMPLATE
 * Last update - MAY 2026
 *
 * Using Three.js v.180.0
 */
ThreeJS is a library that is updated quite often, which is actually very good, and I'm using for this template the version 146 [newer after last course update].
/* ThreeJS (JavaScript) */
// Defined uniforms with desired names
uniforms = {
  u_time: { type: "f", value: 1.0 },
  u_resolution: { type: "v2", value: new THREE.Vector2() },
};
In here you can look on your own time, if you're curious, how everything in here has been written in order for us to read the shaders. Maybe two things about the JavaScript here, that might be interesting, is that here is where we define our uniforms. The u_time and the u_resolution that we can manipulate in our fragment shader.
Hello world with coding [09:10]
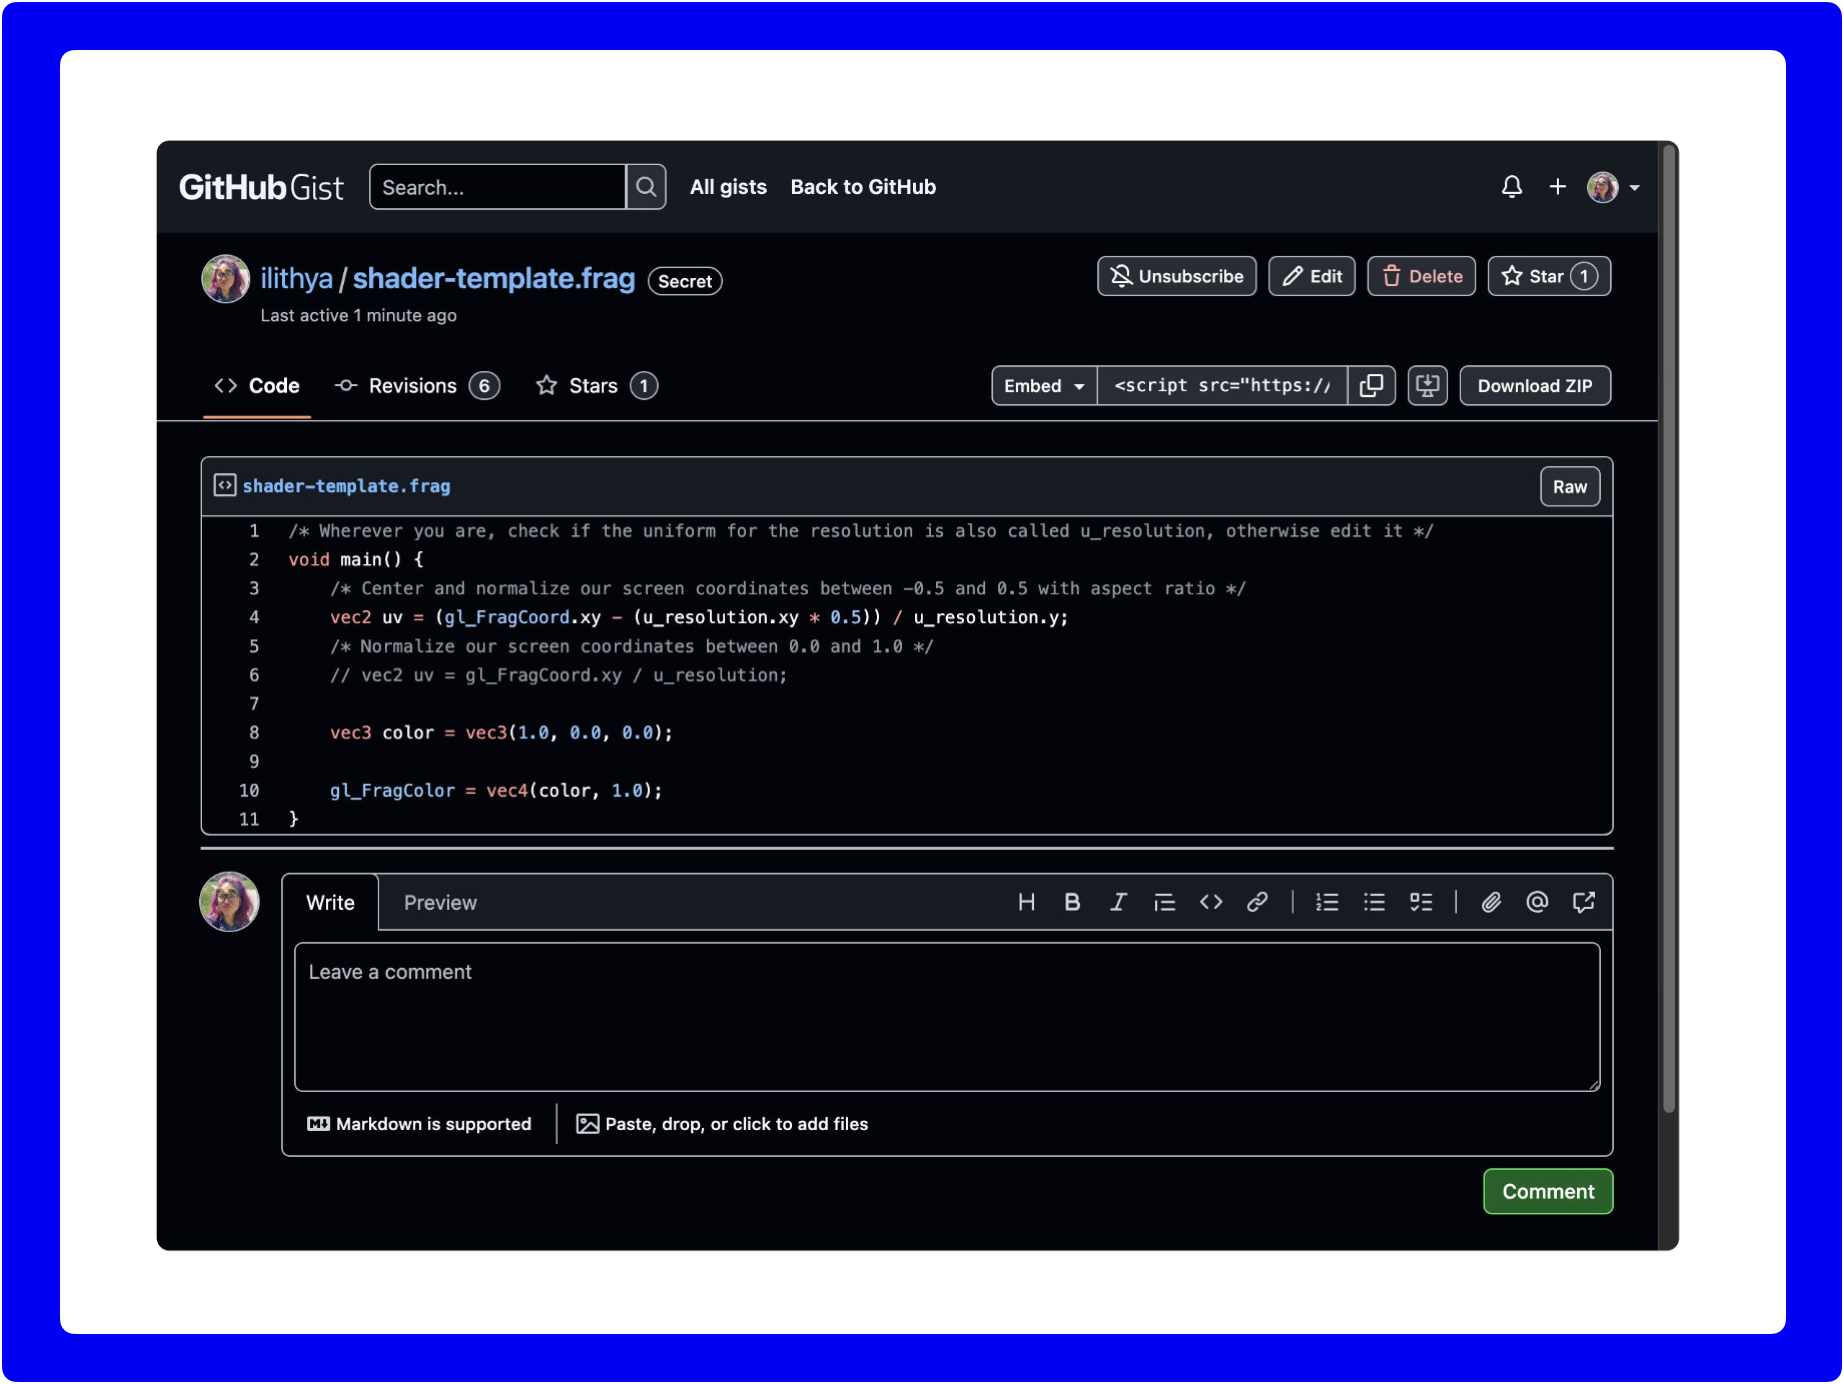
Okay, now let's start with our little hello world, and remember I was saying that from now on I want you to wrap your head around the RGB color model when we start writing shaders, and that is because for now you see red on the screen, behind me, and you see red on the screen, because if you look at the line of code 20 in here, I defined a variable that is a vec3, and in there I have three values (1.0, 0.0, 0.0) which this translates... and I'm going to write comments here, so I'll tell you that [in] RGB [it] would be 100% color value on the red channel, 0% on the green, and 0% on the blue channel.
/* Red: RGB - 100%, 0%, 0% */
vec3 color = vec3(1.0, 0.0, 0.0);
This is what I meant, that I think it becomes easier when we start thinking about the percentage value, instead of 0 to 255 when we want to start making shaders. Remember that I said that to output pixel shaders, we're going to be using this GLSL variable gl_FragColor and in there that variable takes vec4, being the RGB, and then the alpha channel. That's why in here I was writing a variable for those three first value vectors, that are defined in the line 21. I could have named that whatever I wanted by the way, because I'm creating the variable by myself. For example I could have named this maybe colorchannels, a much longer variable, but that means that if I do so, I have to come here and update that variable, and it would still show me this.
I also can show you now, for example, if I didn't want to write a variable for the color, I could have just taken the values here, and put them here instead, and it still renders my color. I'm going to change for example the first value to 0, and when we have 0, we have no color, we have black.
/* Black: RGB - 0%, 0%, 0% */
gl_FragColor = vec4(0.0, 0.0, 0.0, 1.0);

/* Green: RGB - 0%, 100%, 0% */
gl_FragColor = vec4(0.0, 1.0, 0.0, 1.0);
But let's say I put 100% on the green channel, and if I save it, I see it on my screen. This is going to be, for the future, a taste of how you prefer [it], when you start writing your shaders. It could be that you just didn't want to write a variable at all for the color, and you just want to directly output the gl_FragColor and then just enter your three values and the alpha channel [staying] as it is. But I personally find it easier to always have those three channels into a variable, especially because the more lines of code we would start writing, if we want to do something else, it's going to be easier to save it in a variable.
In here, I can also show you for example, let's say we want blue, so then it would be 100% on the third channel. And what about if I want 100% on the green and blue channels, it gives you this aqua color, right? Or if I do green and red channels 100%, it gives me yellow.
/* Blue: RGB - 0%, 0%, 100% */
vec3 color = vec3(0.0, 0.0, 1.0);

/* Aqua: RGB - 0%, 100%, 100% */
vec3 color = vec3(0.0, 1.0, 1.0);

/* Yellow: RGB - 100%, 100%, 0% */
vec3 color = vec3(1.0, 1.0, 0.0);
Now, you might be thinking, oh, what if I want this shade of purple, how could I do purple? I mean, I know that maybe I need some red and blue, but is that really giving me the purple that I want? Maybe I need to tweak the blue and I need to put less of it? And [there] it's when you start tweaking here the values, or maybe it's the opposite. It's actually... I need less red, maybe 50%. 50% would translate to 0.5. And then more, more blue, maybe 100% blue. This would be for example 100%, 50% here, if I want to achieve purple.
/* Purple: RGB - 50%, 0%, 100% */
vec3 color = vec3(0.5, 0.0, 1.0);
You could do that, you can experiment and see what color you get, but if we're just sticking to wanting to display a color, a flat color, as we're doing right now, in this simple hello world with pixel shaders, there are tools out there... and I always like to show, for example, I like this one. This is from ColorKit, it's a color picker and it's created... I'm gonna [scroll down]... by Andy Feliciotti. Thank you for creating this. And I wanted to show you something here, because... a lot of color pickers, they only show hex values and the 8-bit color wheel, but I like this one, because in this one we can get the RGB percentages.
For example, when they're showing us already this bright sea green in here, and we could take this RGB values here, in percentage remember? Because there are percentage and then you have HSL, you have different ways to translate that. We take that here, and let's say I put it in a comment, and I see, okay, I need 57% of red that would translate to 0.57, and then I need 92% of green, so 0.92, and then 73% of blue that would be 0.73, and now let's wait and see, and let's compare, yeah, that gives me that color.
/* Bright sea green: RGB - 57%, 92%, 73% */
vec3 color = vec3(0.57, 0.92, 0.73);
This is just a little tip in case you want to achieve a certain type of color, you can come to this tool, when you click here, here is the color picker, so then you can really like choose, any color that you might want, and if you want to know exactly what those values are... here's another one, now let's just try another one... to see this god of rain blue... we take it here, this was this sort of like mint green, I'm gonna call it... try another color, and this is just [starting to get] familiar, you know.
/* God of rain blue: RGB - 20%, 38%, 79% */
vec3 color = vec3(0.20, 0.38, 0.79);
With this mentality of okay, percentage values translated to floating point numbers in GLSL with pixel shaders [are] gonna give me that block of color on the screen, so 20% red, 0.20, 38% blue channel, 0.38, 79% blue, 0.79, and then I get this shade of god rain of blue.
📝 Course
If you enjoyed this lesson, join the full course including 24 video lessons.
I'm here to guide you through every step of the way in the beginning of your fragment shader journey.